New Project and Library setup
Now that we understand what the design objective is, we can proceed. We make certain assumptions.
1. Our design will be in the directory called C:\test. You can give another name to the directory, but then you need to keep track of it. For example it is entirely possible to choose ( D:\test or C:\projects\test or...). We assume that you have enough understanding of the directory and subdirectory concepts.
2. We need the library made available to us. Fortunately, Cadence has a library in a directory at
C:\Cadence\SPB_16.3\doc\concepthdl_tut\tutorial_examples
Note that your directory may be different that the one listed above, as, your installed directory may be different. Essentially the directory is at < install directory > \doc\concepthdl_tut\tutorial_examples
This directory contains a zipped file called local_lib. We will unzip this file at the desktop and then copy the directory local_lib in the directory C:\test\
3. Creating a Project
To create a project, go to Programs -> Cadence SPB 16.3 -> Project Manager -> Project Manager appears.
We have done this tutorial using Cadence version 16.3, but most of the matter should be applicable to the lower as well, slightly higher 16.5 version.
Click on Create Design Project. Specify the project name as processor and the location as C:\test . Click next at which point it will ask you to add libraries
4. Adding Libraries
There will be two libraries by default - one is standard and other is processor_lib. Click Next and it will ask for design name and design library. Select processor_lib as the Library and example as Design Name and Click Next.Click Finish at the following step. Click Yes on the next screen.
Here is the youtube we have created that shows the steps ( just in case if you are not synchronous with what we are accomplishing).
At this point we wish to add the local_lib library. Click on the Setup icon in the Project Manager. The following diaglog box appears.
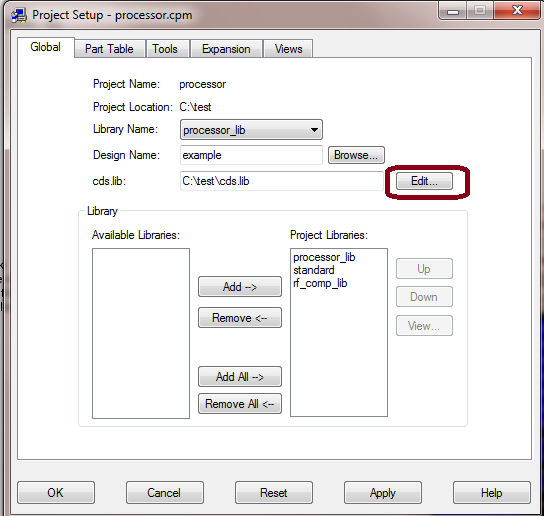
Click Edit next to the cds.lib field. The Project Manager opens the cds.lib file in a text editor.
Enter the following line in the cds.lib file.
DEFINE local_lib C:\test\local_lib
This line in the cds.lib file adds the local_lib library to the available libraries list.
Save and close the cds.lib file.
Click yes when Project Manager displays the message that the cds.lib file has been modified. Do you want to update your library list ?
Project Manager updates the Available Libraries list with the local_lib library.
Select local_lib from the Available Libraries list.
Click Add.
Click the Part Table tab.
Click Add near the Physical Part Table Files field.
The Add Physical Part Table dialog box appears. Select local_lib from the Project Libraries list.
Click File. A file browser appears.
Open the C:\test\local_lib folder.
Select the local_lib.ptf file.
Click Open.
The Add Physical Part Table dialog box displays the path to the local_lib.ptf file.
The Physical Part Table Files field in the Part Table tab displays the path to the local_lib.ptf file.
At this point you have the parts in the library local_lib is available to you.
We have created a youtube video that you may want to go through.
Reference
Most of the material is based upon the tutorial presented by Cadence available at the following directory ( your directory structure may be slightly different).
C:/Cadence/SPB_16.3/doc/concepthdl_tut/proj_crea.html